Live streaming over multiple channels
Some special scenarios require streaming over two or more separate channels. Depending on the scenario, the app joins both channels as host, both channels as audience, or one channel as host and the other as audience. For example, consider the case of an online singing contest, where hosts of different channels interact with each other. The audience receives streams from two channels while the contestants broadcast to both channels.
Agora Video SDK multi-channel streaming allows you to join multiple channels at the same time and broadcast or receive audio and video over them. This page shows you how to implement two different multi-channel methods into your app using Video SDK. Choose the method that best fits your particular scenario.
Understand the tech
Agora Video SDK provides the following approaches to implementing multi-channel streaming:
-
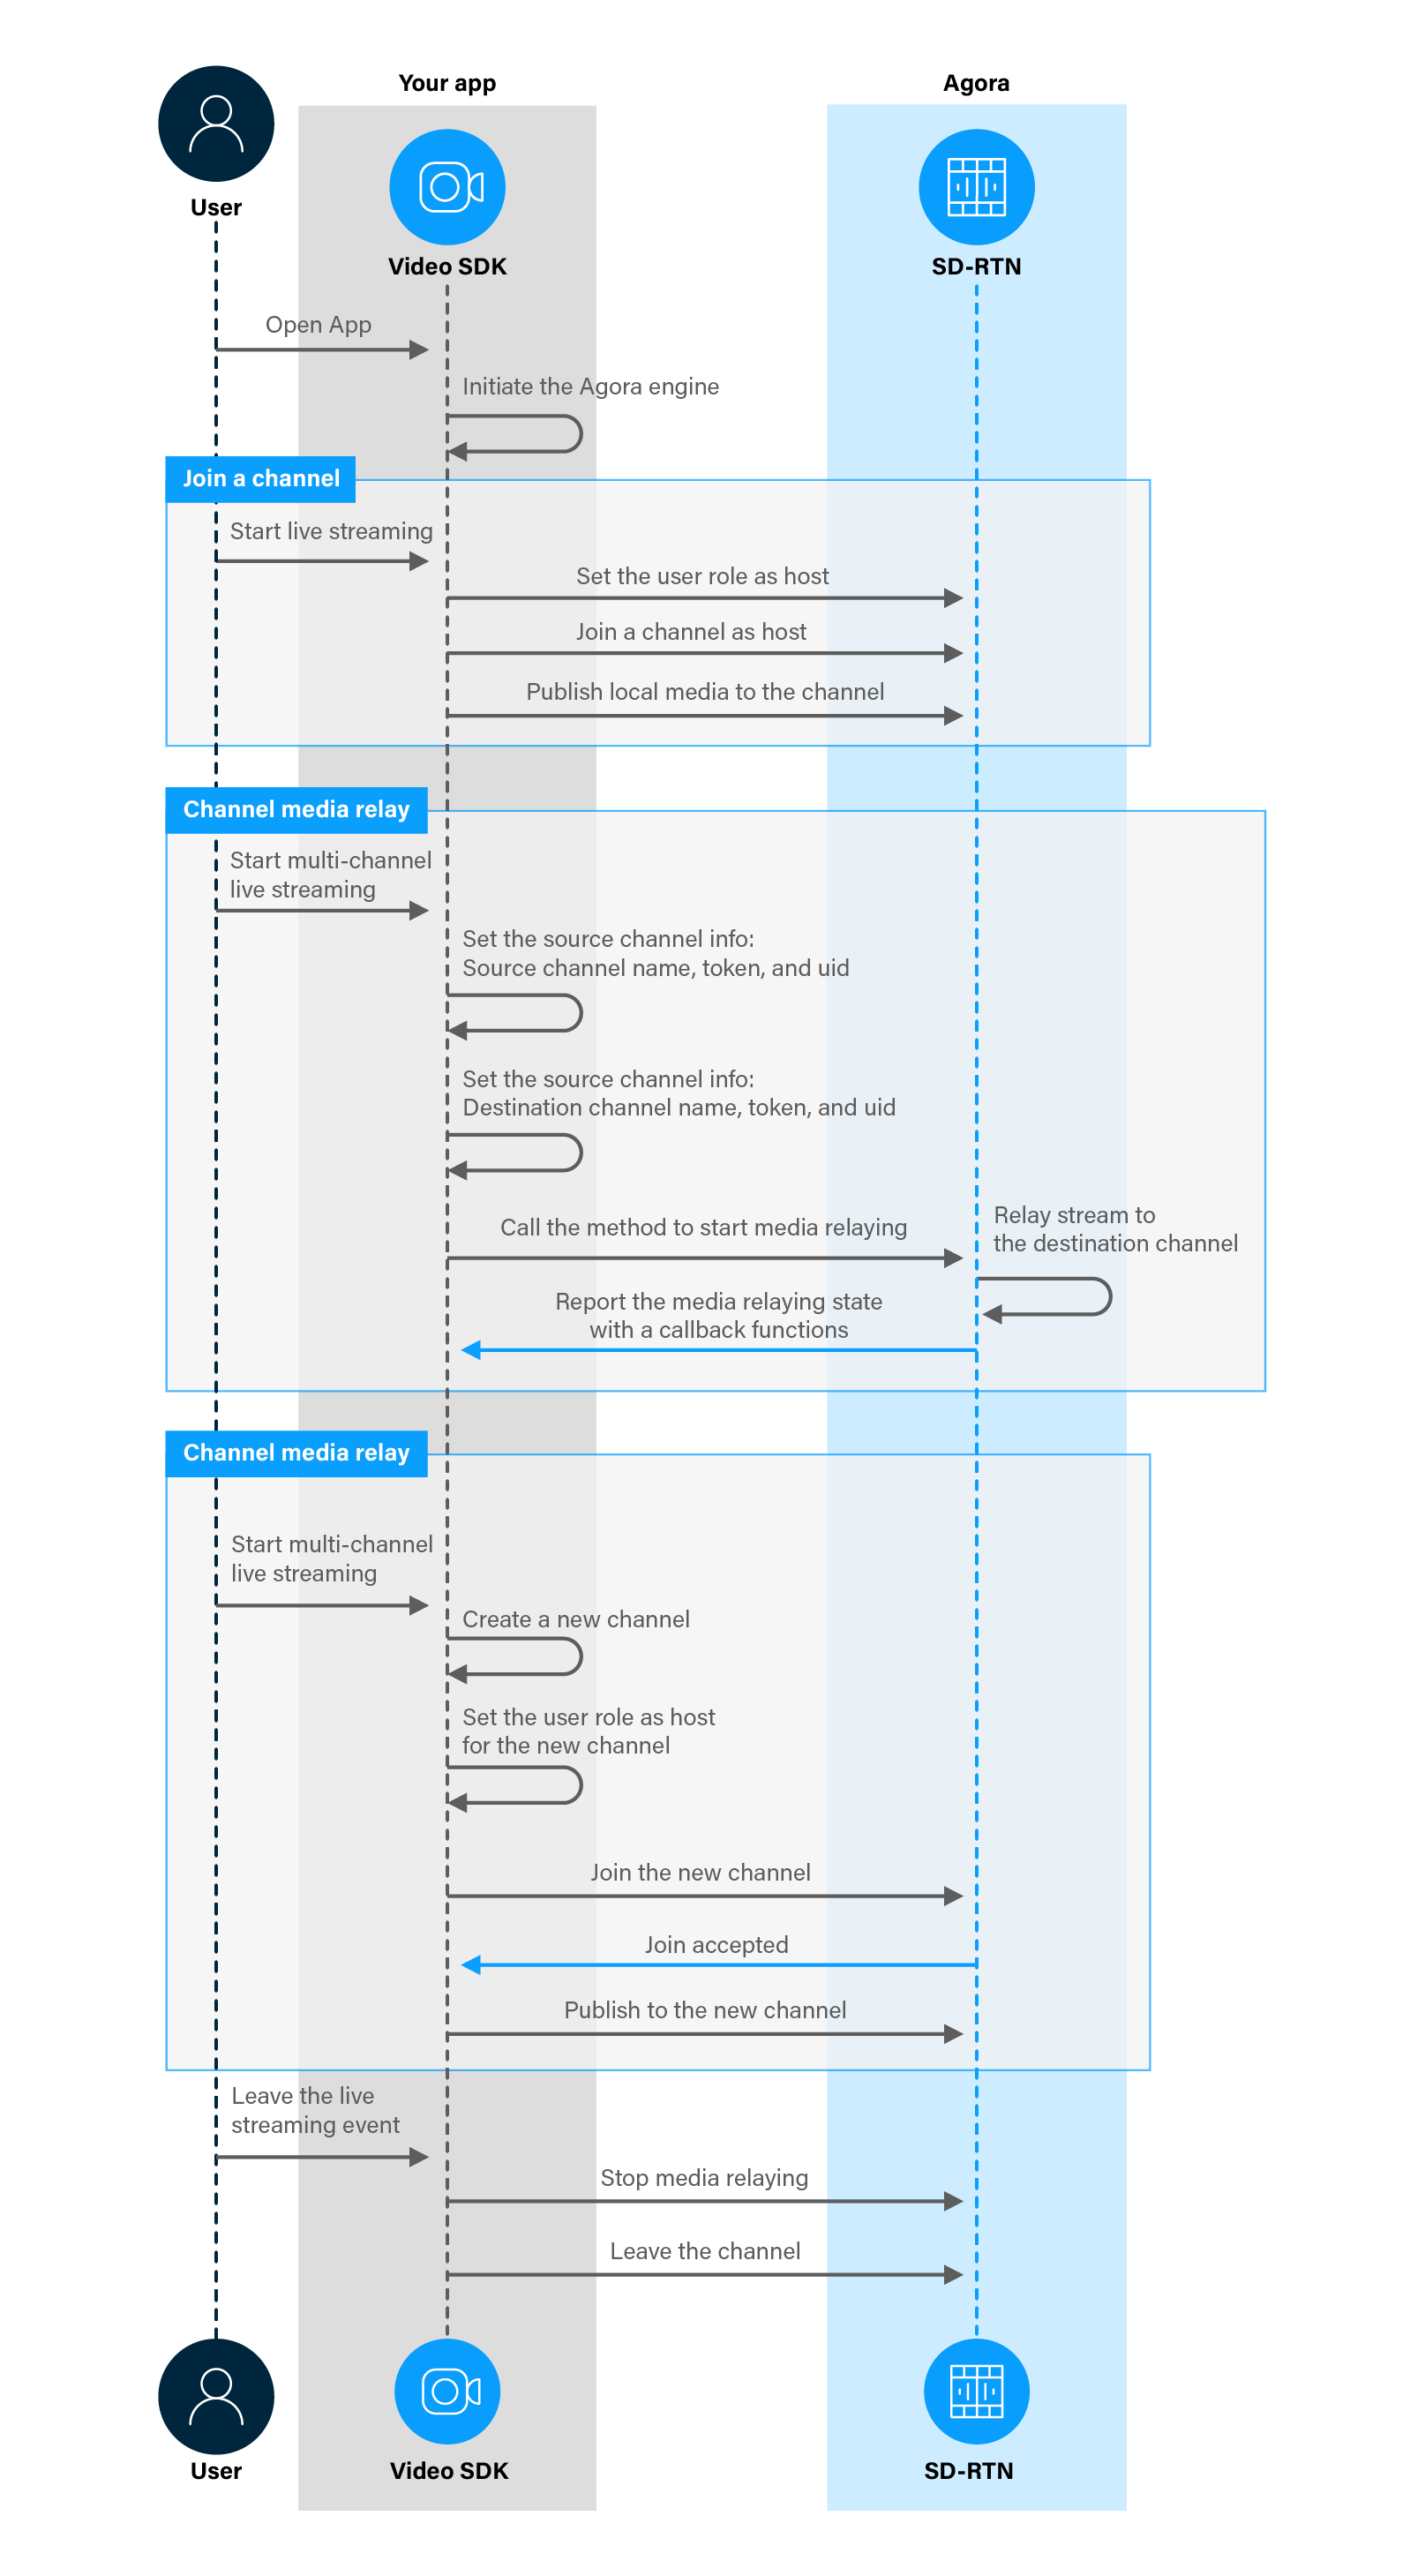
Channel media relay
In channel media relay, one channel is used as the source channel from which audio and video is relayed to a second channel called the destination channel. The audience on the destination channel subscribes to the relayed media stream. A host can relay media stream to a maximum of four destination channels. Relaying media streams provides the following benefits:
- All hosts in the channels can see and hear each other.
- The audience in the channels can see and hear all hosts.
-
Join multiple channels
To join multiple channels, a host first sets up a primary channel and starts an event. The host then joins a second channel and publishes to the new channel. The audience joins either channel and subscribes to the host channel. The two channels are independent and users on one channels don't see users on the other channel. You can extend this functionality to join as many channels as required.
The following figure shows the workflow you need to implement to add multi-channel streaming to your app:
Prerequisites
To follow this procedure you must have implemented the SDK quickstart for Interactive Live Streaming project.
Project setup
In order to create the environment necessary to implement Agora multi-channel streaming into your app, do the following:
- Open the SDK quickstart Interactive Live Streaming project you created previously.
- Contact support@agora.io to enable channel media relay.
Implement multi-channel streaming
This section shows you how to implement the following methods of multi-channel streaming:
Choose the method that best suits your scenario and follow the step by step procedure.
Channel media relay
In this example, you use a single Button to start and stop channel media relay.
Implement the user interface
To enable your users to start and stop relaying to another channel, add a Button to the user interface. In /app/res/layout/activity_main.xml, add the following code before </RelativeLayout>:
You see an error in your IDE. This is because this layout refers to a method that you create later.
Handle the system logic
In your project, import the relevant libraries and declare the required variables.
-
Add the required libraries
To implement media relay and access the UI elements, import the corresponding Agora and Android libraries. In
/app/java/com.example.<projectname>/MainActivity, add the following to the list ofimportstatements: -
Declare the variables you need
To store source and destination channel settings and manage channel relay, in
/app/java/com.example.<projectname>/MainActivity, add the following variable declarations to theMainActivityclass: -
Access the channel relay button
In the
onCreatemethod of theMainActivityclass, add the following lines aftersetupVideoSDKEngine();:
Implement channel media relay
To enable app users to relay channel media to a destination channel, take the following steps:
-
Start or stop channel media relay
When a user presses the button, the app starts relaying media from the source channel to the destination channel. If channel media relay is already running, the app stops it. To integrate this workflow, add the following method to the
MainActivityclass. -
Monitor the channel media relay state
To receive the state change notifications sent during media relay, you add a method to the
IRtcEngineEventHandler. Your app responds to connection and failure events in theonChannelMediaRelayStateChangedevent handler. In theMainActivityclass, add the following method afterprivate final IRtcEngineEventHandler mRtcEventHandler = new IRtcEngineEventHandler() {: -
Monitor channel media relay events
To receive notifications of important channel relay events such as network disconnection, reconnection, and users joining channels, you add the
onChannelMediaRelayEventmethod to theIRtcEngineEventHandler. In theMainActivityclass, add the following method afterprivate final IRtcEngineEventHandler mRtcEventHandler = new IRtcEngineEventHandler() {:
Join multiple channels
The alternate approach to multi-channel live streaming is joining multiple channels. In this section, you learn how to implement joining a second channel in your app.
Implement the user interface
In this example, you use a single Button to join and leave a second channel. To add the Button, in /app/res/layout/activity_main.xml, add the following code before </RelativeLayout>:
Handle the system logic
In your project, import the relevant libraries and declare the required variables.
-
Add the required libraries
To connect to multiple channels and access the UI elements, import the corresponding Agora and Android libraries. In
/app/java/com.example.<projectname>/MainActivity, add the following to the list ofimportstatements: -
Declare the variables you need
To join and manage a second channel, in
/app/java/com.example.<projectname>/MainActivity, add the following declarations to theMainActivityclass: -
Enable the user to join another channel
-
In the
onCreatemethod of theMainActivityclass, add the following lines aftersetupVideoSDKEngine();: -
Enable this button when a user joins the initial channel. Add the following line to the
joinChannelmethod afterisJoined = true;:
-
Implement joining multiple channels
To add multi-channel functionality to your app, take the following steps:
-
Use the multi-channel enabled
RtcEngineExinterfaceIn the SDK quickstart code, the Agora Engine instance was declared as
RtcEngine. To implement multi-channel functionality, you use the multi-channel interface of the Agora EngineRtcEngineEx. In order to switch to the multi-user interface, do the following:-
In the
MainActivityclass, replace the declarationprivate RtcEngine agoraEngine;with: -
In the
setupVideoSDKEnginemethod, replace the lineagoraEngine = RtcEngine.create(config);with the following:
-
-
Join a second channel
When a user presses the button, the app joins a second channel. If the app is already connected to a second channel, it leaves the channel. To do this, add the following method to the
MainActivityclass. -
Receive callbacks from the second channel
The
IRtcEngineEventHandlerimplements channel callbacks. For the second channel, you create another instance ofIRtcEngineEventHandlerand register it with the Agora Engine when you join the channel usingjoinChannelEx. To create an instance namedsecondChannelEventHandler, add the following code to theMainActivityclass: -
Update the
setupRemoteVideomethodIn this example, you display two remote videos from two different channels. To display a remote video in either frame, update the
setupRemoteVideomethod by doing the following:-
Replace the
setupRemoteVideo(int uid)method with the following: -
To update the
setupRemoteVideomethod call, inonUserJoinedundermRtcEventHandler, replacerunOnUiThread(() -> setupRemoteVideo(uid));with the following: -
For null safety, in
onUserOfflineundermRtcEventHandler, replacerunOnUiThread(() -> remoteSurfaceView.setVisibility(View.GONE));with the following:
-
Test your implementation
To ensure that you have implemented multi-channel streaming into your app, follow the relevant testing procedure:
Test channel media Relay
-
Make sure co-host token authentication is enabled for your project in Agora Console.
-
In Android Studio, open
app/java/com.example.<projectname>/MainActivityand updateappId,channelNameanddestChannelName. -
Generate a temporary token in Agora Console using
appIdandchannelName. Use it to updatetokeninMainActivity. Use the same values to generate another token and updatesourceChannelToken. -
Generate a third token in Agora Console using
appIdanddestChannelName. Use it to updatedestChannelTokeninMainActivity. -
In your browser, navigate to the Agora web demo and update App ID, Channel, and Token with the values for your temporary token, then click Join.
-
Repeat the previous step on a second device, but this time use
appId,destChannelName, anddestChannelTokento Join the channel. -
Connect an Android device to your development device.
-
In Android Studio, click Run app. A moment later, you see the project installed on your device.
If this is the first time you run your app, grant camera and microphone permissions.
-
Select Host and press Join. You see the video from the web browser demo app connected to
channelNamein the top frame of your app. -
Press Start Channel Media Relay. You see the video from the web browser demo app connected to
channelNamerelayed to the web browser demo app connected todestChannelName. -
Press Stop Channel Media Relay. The media relaying is stopped.
Test joining multiple channels
-
In Android Studio, open
app/java/com.example.<projectname>/MainActivityand updateappId,channelNameandsecondChannelName. -
Generate a temporary token in Agora Console using
appIdandchannelName. Use it to updatetokeninMainActivity. -
Generate a second token in Agora Console using
appIdandsecondChannelName. Use it to updatesecondChannelTokeninMainActivity. -
In your browser, navigate to the Agora web demo and update App ID, Channel, and Token with the values for your temporary token, then click Join.
-
Repeat the previous step on a second device, but this time use
appId,secondChannelName, andsecondChannelTokento Join the channel. -
Connect an Android device to your development device.
-
In Android Studio, click Run app. A moment later, you see the project installed on your device.
If this is the first time you run your app, grant camera and microphone permissions.
-
Select Audience
- Press Join. You see the video from the web browser demo app connected to
channelNamein the top frame of your app. - Press Join Second Channel. You see the video from the web browser demo app connected to
secondChannelNamein the bottom frame of your app. - Press Leave Second Channel and then Leave to exit both channels.
- Press Join. You see the video from the web browser demo app connected to
-
Select Host
- Press Join. You see the local video in the top frame of your app. The web browser demo app connected to
channelNameshows the video from your app. - Press Join Second Channel. You see the video from the web browser demo app connected to
secondChannelNamein the bottom frame of your app. - Press Leave Second Channel to exit both channels.
- Press Join. You see the local video in the top frame of your app. The web browser demo app connected to
Reference
This section contains information that completes the information in this page, or points you to documentation that explains other aspects to this product.
- Ensure that each RtcConnection object has a unique user ID that is not 0.
- You can configure the publishing and subscribing options for the RtcConnection object in joinChannelEx.
- Each RtcConnection can publish multiple audio streams and a video stream simultaneously.
- When calls to
startOrUpdateChannelMediaRelayare too frequent, they are rejected andRELAY_EVENT_PACKET_UPDATE_DEST_CHANNEL_REFUSED(8)is returned.