UI Kit quickstart
Agora UI Kit makes it easy to add Interactive Live Streaming to your app in minutes. UI Kit is an Open Source project that includes best practices for business logic, as well as a pre-built video UI. Every piece is customizable, so the developer has full control over how the video call looks and feels.
This page outlines the minimum code you need to integrate high-quality, low-latency Interactive Live Streaming functionality into your app with a customizable UI.
Understand the tech
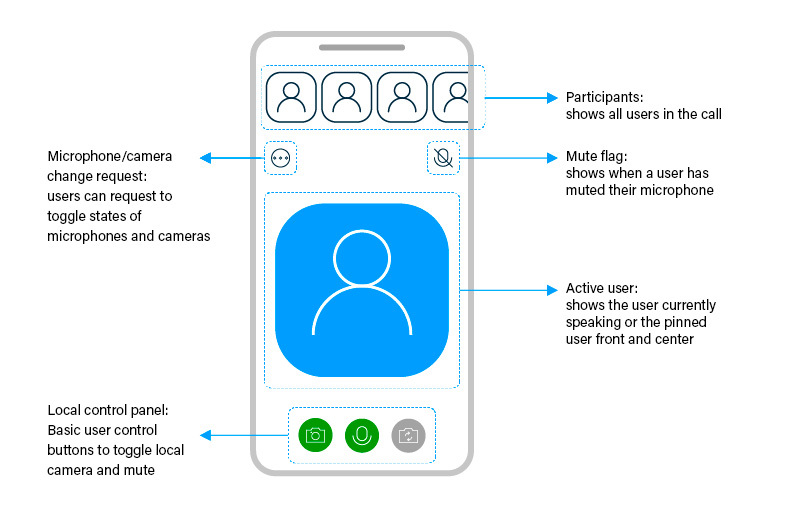
UI Kit simplifies the implementation of Interactive Live Streaming by handling common calling logic such as remote user status, and displaying it in a pre-built customizable UI. UI Kit contains the following components:
To use UI Kit, you implement the following steps in your app:
-
Create an instance of the viewer
Declare and initialize an instance of the UI Kit viewer.
-
Join a channel
When you execute the
joincommand, your app joins the channel, publishes the local audio and video streams to Agora SD-RTN™, and handles audio and video for anyone else who joins the call in a default UI.Yes, you read that right. After initializing a viewer instance, you can create or join a channel with just one line of code.
Prerequisites
To follow this procedure you must have:
- Android Studio 4.1 or higher.
- Android SDK API Level 24 or higher.
- A mobile device that runs Android 4.1 or higher.
-
A computer with Internet access.
Ensure that no firewall is blocking your network communication.
Project setup
To integrate Interactive Live Streaming into your app using UI Kit, do the following:
-
In Android Studio, create a new Phone and Tablet Android project with an Empty Activity using Java. Set Minimum SDK to API 24.
After creating the project, Android Studio automatically starts gradle sync. Ensure that the sync succeeds before you continue.
-
Integrate UI Kit into your project:
In
Gradle Scripts/settings.gradle (Project Settings), reference thejitpackrepository by adding the following line to therepositoriessection insidedependencyResolutionManagement: -
In
Gradle Scripts/build.gradle (Module: <projectname>), add the UI Kit dependency. Thedependenciessection should look like the following:Find the Latest version of the UI Kit and replace
<version>with the one you want to use. For example: 4.0.1. -
Sync Gradle and import the UI Kit.
-
Add permissions for network and device access.
In
/app/Manifests/AndroidManifest.xml, add the following permissions after</application>:
Implement a client for Interactive Live Streaming
When a user opens the app, you initialize UI Kit. When the user taps a button, the app joins or leaves a channel. When another user joins the same channel, their video and audio is rendered in the app. This simple workflow enables you to concentrate on implementing Agora features and not UX bells and whistles.
To integrate real-time video with a ready-made user interface into your app using UI Kit:
Import the UI Kit classes
In /app/java/com.example.<projectname>/MainActivity, add the provided code sample after import android.os.Bundle;:
Add the variables to initiate and join a channel
In /app/java/com.example.<projectname>/MainActivity, add the provided code sample after AppCompatActivity:
Create a function that initializes an AgoraVideoViewer instance and joins a channel
In /app/java/com.example.<projectname>/MainActivity, add the provided code sample after the variable declarations:
Start your app
In /app/java/com.example.<projectname>/MainActivity, update onCreate to run initializeAndJoinChannel() when the app starts. The updated code should like the provided code sample:
Test your implementation
To ensure that you have implemented Interactive Live Streaming in your app:
-
Generate a temporary token in Agora Console
-
In your browser, navigate to the Agora web demo and update App ID, Channel, and Token with the values for your temporary token, then click Join.
-
In Android Studio, in
app/java/com.example.<projectname>/MainActivity, updateappId,channelNameandtokenwith the values for your temporary token. -
Connect a physical Android device to your development device.
-
In Android Studio, click Run app. A moment later you see the project installed on your device.
-
If this is the first time you run the project, grant microphone and camera access to your app, then press the button to join a channel.
Reference
This section contains information that completes the information in this page, or points you to documentation that explains other aspects to this product.
- Now you have created an app with UI Kit, see how to Customize your app.
-
See the Open Source UI Kit projects on GitHub here.
-
Downloads shows you how to install Video SDK manually.
-
To ensure communication security in a test or production environment, use a token server to generate token is recommended to ensure communication security, see Implement the authentication workflow.