Raw video and audio processing
In some scenarios, raw audio and video captured through the camera and microphone must be processed to achieve the desired functionality or to enhance the user experience. Video SDK enables you to pre-process and post-process the captured audio and video data for implementation of custom playback effects.
Understand the tech
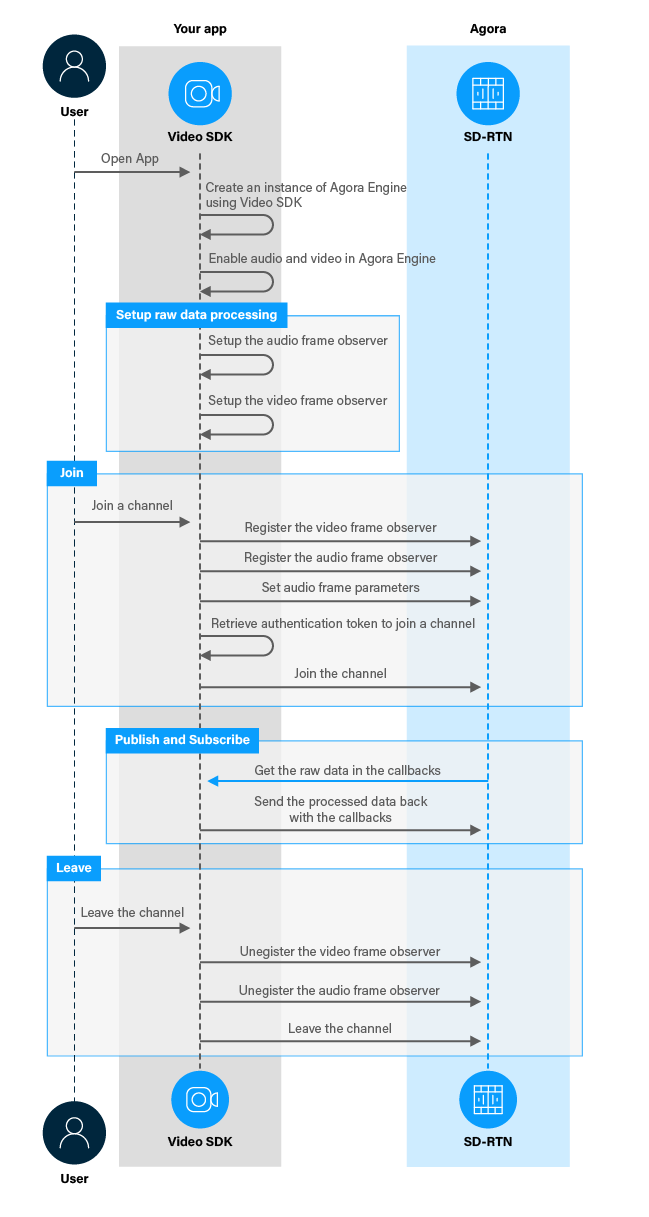
You can use the raw data processing functionality in Video SDK to process the feed according to your particular scenario. This feature enables you to pre-process the captured signal before sending it to the encoder, or to post-process the decoded signal before playback. To implement processing of raw video and audio data in your app, take the following steps.
- Set up video and audio frame observers.
- Register video and audio frame observers before joining a channel.
- Set the format of audio frames captured by each callback.
- Implement callbacks in the frame observers to process raw video and audio data.
- Unregister the frame observers before you leave a channel.
The figure below shows the workflow you need to implement to process raw video and audio data in your app.

Prerequisites
To follow this procedure you must have implemented the SDK quickstart project for Video Calling.
Project setup
To create the environment necessary to integrate processing of raw audio and video data in your app, open the SDK quickstart Video Calling project you created previously.
Implement raw data processing
When a user captures or receives video and audio data, the data is available to the app for processing before it is played. This section shows how to retrieve this data and process it, step-by-step.
Implement the user interface
To enable or disable processing of captured raw video data, add a button to the user interface. In /app/res/layout/activity_main.xml add the following lines before </RelativeLayout>:
Handle the system logic
This sections describes the steps required to use the relevant libraries, declare the necessary variables, and set up access to the UI elements.
-
Import the required Android and Agora libraries
To integrate Video SDK frame observer libraries into your app and access the button object, add the following statements after the last
importstatement in/app/java/com.example.<projectname>/MainActivity. -
Define a variable to manage video processing
In
/app/java/com.example.<projectname>/MainActivity, add the following declaration to theMainActivityclass:
Implement processing of raw video and audio data
To register and use video and audio frame observers in your app, take the following steps:
-
Set up the audio frame observer
IAudioFrameObservergives you access to each audio frame after it is captured or access to each audio frame before it is played back. To setup theIAudioFrameObserver, add the following lines to theMainActivityclass after variable declarations: -
Set up the video frame observer
IVideoFrameObservergives you access to each local video frame after it is captured and access to each remote video frame before it is played back. In this example, your modify the captured video frame buffer to crop and scale the frame and play a zoomed-in version of the video. To set upIVideoFrameObserver, add the following lines to theMainActivityclass after the variable declarations:Note that you must set the return value in
getVideoFrameProcessModeto1in order for your raw data changes to take effect. -
Register the video and audio frame observers
To receive callbacks declared in
IVideoFrameObserverandIAudioFrameObserver, you must register the video and audio frame observers with the Agora Engine before joining a channel. To specify the format of audio frames captured by eachIAudioFrameObservercallback, use thesetRecordingAudioFrameParameters,setMixedAudioFrameParametersandsetPlaybackAudioFrameParametersmethods. To do this, add the following lines afterif (checkSelfPermission()) {in thejoinChannelmethod: -
Unregister the video and audio observers when you leave a channel
When you leave a channel, you unregister the frame observers by calling the register frame observer method again with a
nullargument. To do this, add the following lines to theleaveChannel(View view)method beforeagoraEngine.leaveChannel();: -
Start and stop video processing
When a user presses the button, enable or disable video processing. To do this, add the following method to the
MainActivityclass:
Test your implementation
To ensure that you have implemented raw data processing into your app:
-
Generate a temporary token in Agora Console.
-
In your browser, navigate to the Agora web demo and update App ID, Channel, and Token with the values for your temporary token, then click Join.
-
In Android Studio, open
app/java/com.example.<projectname>/MainActivity, and updateappId,channelNameandtokenwith the values for your temporary token. -
Connect a physical Android device to your development device.
-
In Android Studio, click Run app. A moment later you see the project installed on your device.
If this is the first time you run the project, grant microphone and camera access to your app.
-
Press Join to see the video feed from the web app.
-
Test processing of raw video data.
Press Zoom In. You see that the local video captured by your device camera is cropped and scaled to give a zoom-in effect. The processed video is displayed both locally and remotely. Pressing the button again stops processing of raw video data and restores the original video.
-
Test processing of raw audio data.
Edit the
iAudioFrameObserverdefinition by adding code that processes the raw audio data you receive in the following callbacks:-
onRecordAudioFrame: Gets the captured audio frame data -
onPlaybackAudioFrame: Gets the audio frame for playback
-
Reference
This section contains information that completes the information in this page, or points you to documentation that explains other aspects to this product.