Volume control and mute
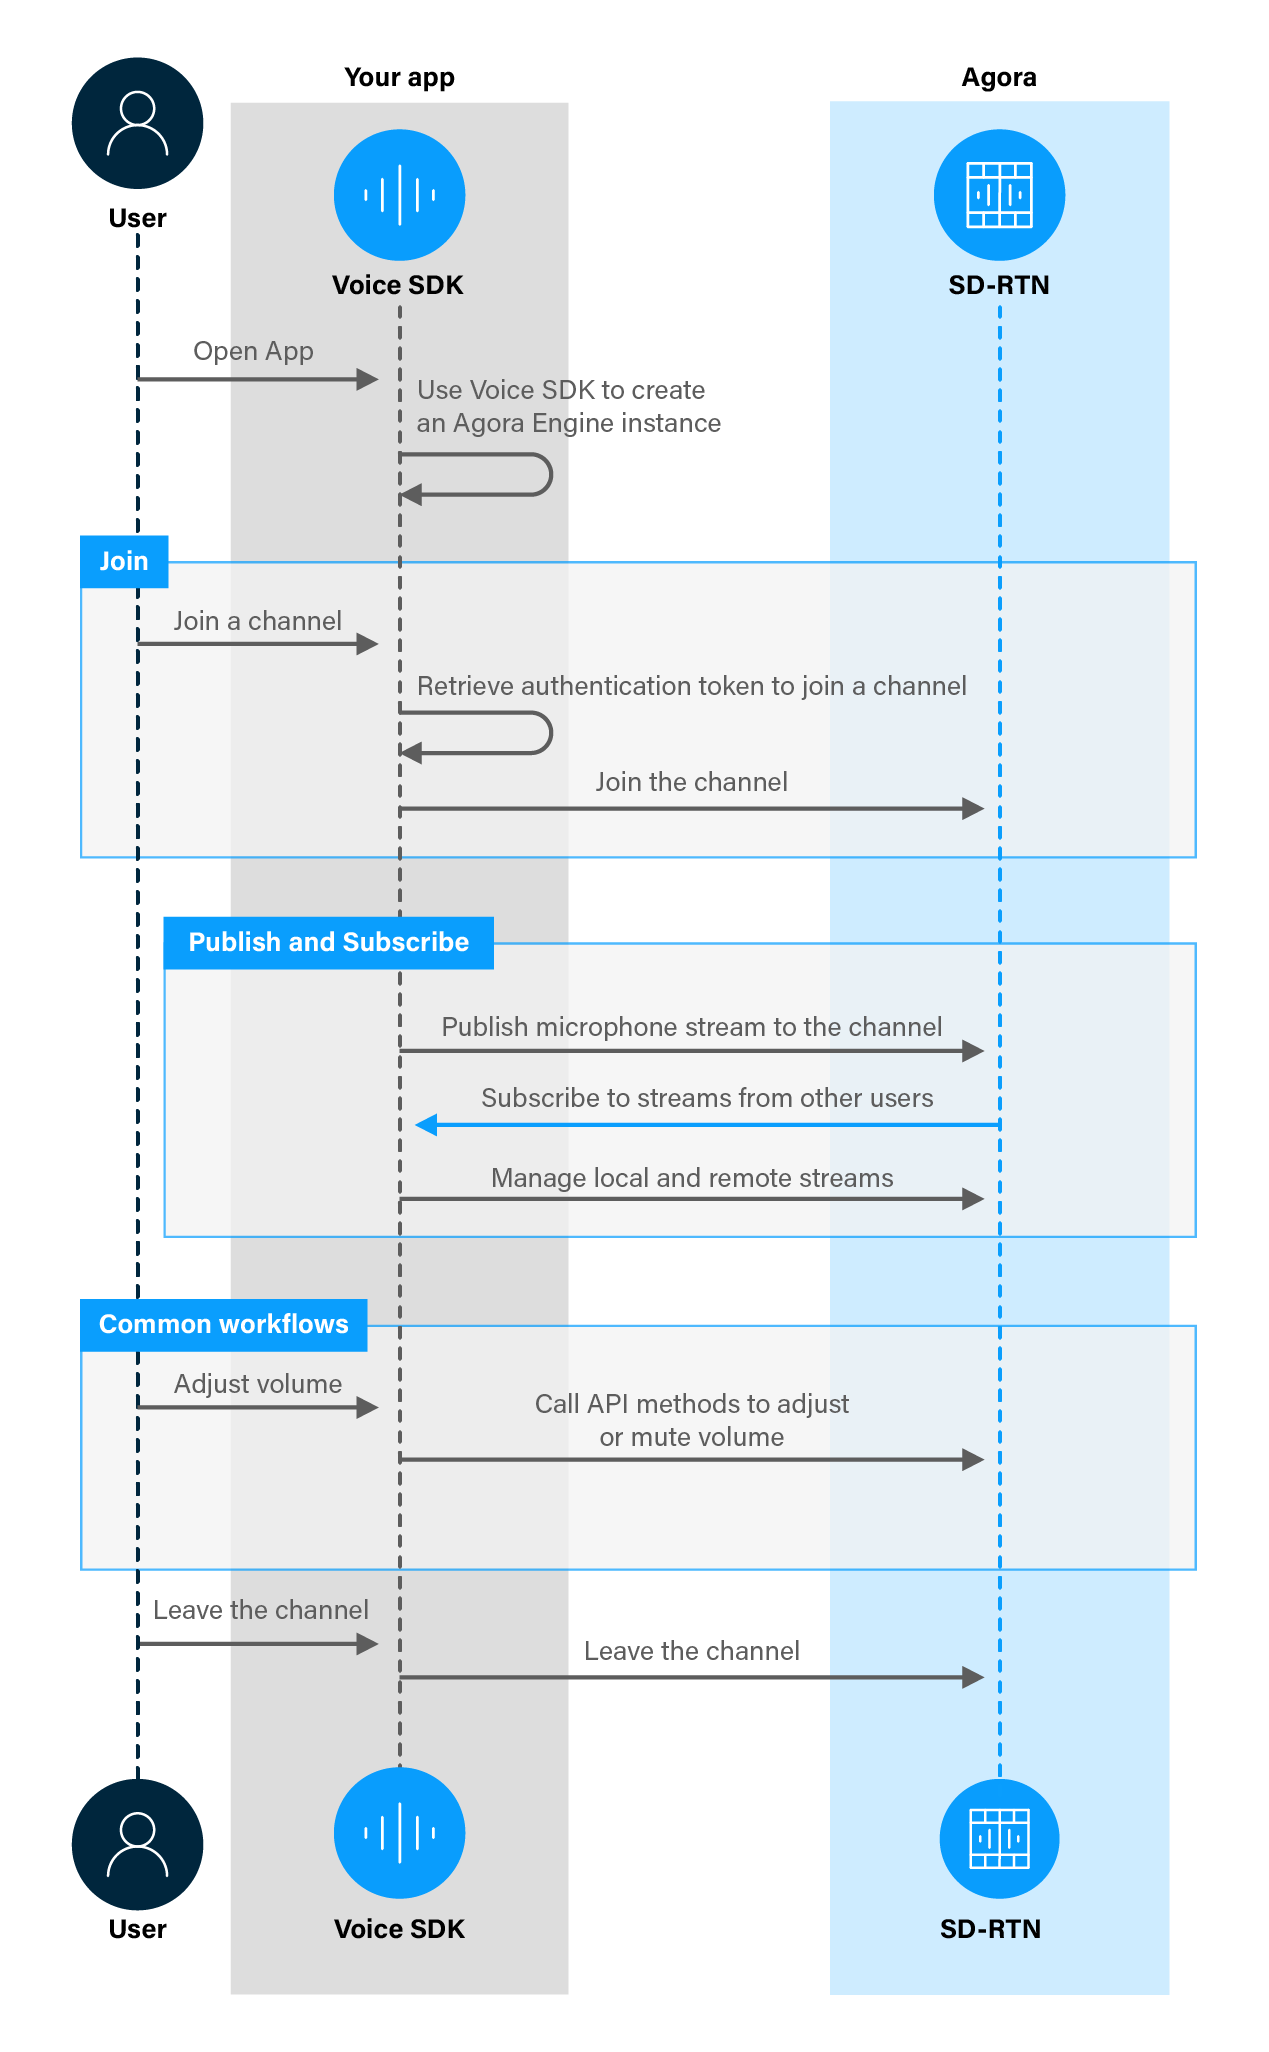
To use Voice SDK for audio communication, you implement a simple workflow in your app. The app joins a new or an existing channel using an app ID and an authentication token. If a channel of the given name exists within the context of the app ID, the app joins the channel. If the named channel does not exist, a new channel is created that other users may join. Once the app joins a channel, it subscribes to one or more of the audio streams published in the channel. The app also publishes its own audio stream that other users in the channel subscribe to. Each user publishes streams that share their microphone or audio data.
The basics of joining and leaving a channel are presented in the SDK quickstart for Voice Calling. This document explains the common workflows you need to handle in your app.
Understand the tech
The following figure shows the typical workflow you integrate into your app in order to publish and subscribe to audio streams.
This page shows you how to add the following features to your app:
-
Volume control
Users in a channel often need to adjust the volume for local and remote audio. For example, they may want to increase the input volume from remote users and decrease the local audio recording volume. You use Voice SDK to enable app users to adjust recording and playback volumes. Voice SDK also provides methods to mute local audio, audio from a particular remote user, or audio from all remote users. Voice SDK provides several methods to manage local and remote audio volumes. These methods enable the user to control:
- Recording signal volume: The volume of the signal recorded by the local user.
- Playback signal volume: The playback audio level, after audio mixing, for all remote users, or for a specific remote user.
- In-ear monitoring volume: The volume of their own voice, users hear through wired earphones.
- Audio mixing volume: The mixing volume for local playback and for sending to other users.
- Muting audio streams: Stop or resume playing a specified remote or local audio.
Prerequisites
To follow this procedure you must have implemented the SDK quickstart project for Voice Calling.
Project setup
To create the environment necessary to implement screen sharing and volume control features into your app, open the SDK quickstart Voice Calling project you created previously.
Implement volume control
This section shows how to use Voice SDK to implement volume control in your app, step-by-step.
Implement the user interface
In a real-world application, for each volume setting you want the user to control, you typically add a volume control UI element such as a SeekBar to the audio configuration panel. To enable the user to mute local or remote audio, you add a switch or a CheckBox to the interface for each user. In this example, you add a SeekBar and a CheckBox to the UI to test different volume settings.
To add the UI elements, in /app/res/layout/activity_main.xml, add the following code before </RelativeLayout>:
Handle the system logic
Add the required libraries
To access and use the UI elements, import the corresponding Android libraries. In /app/java/com.example.<projectname>/MainActivity, add the following to the list of import statements:
Implement volume control logic
To implement volume control in your app, take the following steps:
-
Declare the variables you need
To read, store and apply volume settings, in
/app/java/com.example.<projectname>/MainActivity, add the following declarations to theMainActivityclass: -
Store the
uidof the remote userTo adjust the volume or mute a specific remote user, you need the
uidof that user. Add the following line to the beginning of theonUserJoinedcallback, to store theremoteUid: -
Adjust or mute the volume
You use the
OnSeekBarChangeListenerandOnCheckedChangeListenercallbacks to handle the volume change actions taken by the user. In/app/java/com.example.<projectname>/MainActivity, add the following lines toonCreateafterSetupVideoSDKEngine();:When using a device to capture audio, Voice SDK sets a default global volume value of 85 (range [0, 255]). Voice SDK automatically increases a capture device volume that's too low. You can adjust the capture volume as per your needs by adjusting the microphone or sound card's signal capture volume.
Test your implementation
To ensure that you have implemented Voice Calling in your app:
-
Generate a temporary token in Agora Console .
-
In your browser, navigate to the Agora web demo and update App ID, Channel, and Token with the values for your temporary token, then click Join.
-
In Android Studio, open
app/java/com.example.<projectname>/MainActivityand updateappId,channelNameandtokenwith the values from Agora Console. -
Connect an Android device to your development device.
-
In Android Studio, click Run app. A moment later, you see the project installed on your device.
If this is the first time you run your app, grant camera and microphone permissions.
-
Press Join to connect to the same channel as your web demo.
-
Test volume control
-
Speak into your Android device as you move the slider on the
SeekBarto the left and then right. You notice the volume decrease and then increase in the web demo app as the recording volume changes. -
Tap the Mute
CheckBoxwhile you speak into the microphone connected to the web demo app.You notice that the remote audio is muted on your Android device.
-
To test other volume control methods, in
onProgressChangedreplace theadjustRecordingSignalVolumecall with one of the following:Run the app again and use the volume slider to test the change in the corresponding volume setting.
-
To test other mute methods, in
onCheckedChangedreplace themuteRemoteAudioStreamcall with one of the following:Run the app again and tap the
CheckBoxto test the effect of these mute methods.
-
-
In Visual Studio, in
AgoraImplementation.h, updateappId,channelNameandtokenwith the values for your temporary token. -
In Visual Studio, click Local Windows Debugger. A moment later, you see the app running on your development device.
If this is the first time you run your app, grant camera and microphone permissions.
-
Press Join to connect to the same channel as your web demo.
-
Test volume control
-
Speak into your development device as you move the slider on the slider to the left and then right. You notice the volume decrease and then increase in the web demo app as the recording volume changes.
-
Tap Mute while you speak into the microphone connected to the web demo app. You notice that the remote audio is muted on your development device.
-
To test other volume control methods, in
AgoraImplementationDlg.cpp, replace theadjustRecordingSignalVolumecall inOnNMCustomdrawSlider2with one of the following:Run the app again and use the volume slider to test the change in the corresponding volume setting.
-
To test other mute methods, in
AgoraImplementationDlg.cpp, replace themuteRemoteAudioStreamcall inOnBnClickedCheck1with one of the following:Run the app again and tap the
CheckBoxto test the effect of these mute methods.
-
Reference
This section contains information that completes the information in this page, or points you to documentation that explains other aspects to this product.