Supply course materials
In many online teaching scenarios, teachers use a variety of interactive courseware to deliver an informative learning experience. Flexible Classroom enables teachers to display such courseware during classes. The supported formats are PPT, PPTX, DOC, DOCX, PDF, MP3, MP4, PNG, JPG, and GIF.
Courseware in flexible classrooms can be divided into two categories:
- Public resources: Uploaded and maintained by educational agencies; teachers cannot edit the courseware.
- Personal resources: Uploaded and maintained by teachers on the client end.
To display courseware on the whiteboard in flexible classrooms, you must convert the courseware to a format supported by the Agora Interactive Whiteboard service. For security reasons, Flexible Classroom does not store your courseware; all courseware must be stored either in a third-party cloud storage account that you provide or on your own server.
Upload courseware before a class
If you want to upload the courseware to third-party cloud storage or to your own server before a class and then display the courseware in Flexible Classroom, perform the following steps:
-
In Agora Console, enable and configure the Whiteboard feature to store the courseware used in Flexible Classroom.
-
In Agora Console, enable the file-conversion feature of the Whiteboard service, and add a storage configuration for storing the converted courseware. For details, see How to enable the file-conversion feature.
-
On your app server, call this RESTful API to start a file-conversion task. The Agora Interactive Whiteboard service uploads the converted files to the third-party cloud storage that you have configured in Agora Console.
-
On your app server, poll this RESTful API to query the progress of a file-conversion task. Pay special attention to the
convertedFileListparameter in the response. This parameter contains an array of converted files. EachconvertedFileListobject contains the following parameters:width: Number. Indicates the width of the image in pixels.height: Number. Indicates the height of the image in pixels.conversionFileUrl: String. Indicates the URL of the generated image.preview: String. Indicates the address of the preview. This field is returned only whenpreviewis set astrueandtypeis set asdynamicin the request body when starting file conversion.
-
When you call launch on your client, pass in the list of converted files by setting the courseWareList parameter. Then students can see the courseware in the classroom.
Upload courseware during a class
To upload courseware during a class, perform the following steps:
-
Log in to Flexible Classroom, and enter the desired classroom.
-
Click Cloud Drive in the tool bar, and then click Upload as shown in the following screenshot:
You can delete your personal resources by selecting the option icon and clicking Delete, as shown in the following screenshot:
Cloud storage configuration
To ensure that Flexible Classroom can access your cloud storage, configure your cloud storage account as follows:
-
Alibaba Cloud OSS account
-
Ensure that read and write permissions are set to public read.
-
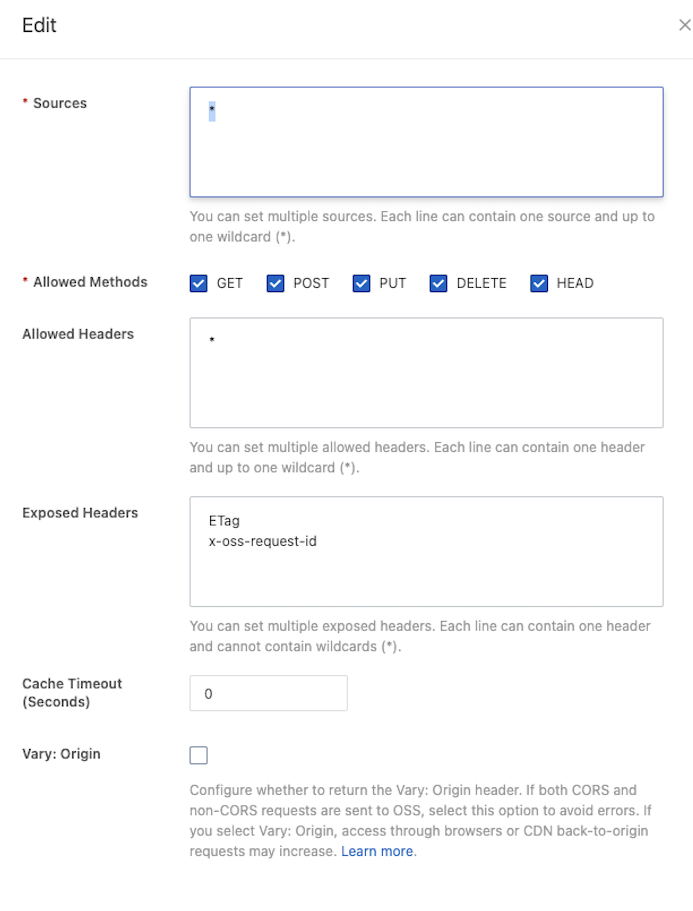
Cross domain rule configuration
- Configure Source and Allow Headers according to your actual situation.
- Exposure Headers must be filled in according to the figure below:

-
-
AWS S3 accounts
-
Bucket policy
-
Cross-origin resource sharing
-